A classroom layout that prioritizes community building over behavior modification creates an environment for learning success. We’ve entered a relatively new era in educational history where supportive learning environments are no longer determined simply by how quietly or obediently students behave but rather by students feeling “safe, relaxed, and willing to take risks.” Supportive learning environments start with the layout of a classroom’s physical space and go beyond mere distraction reduction to utilize the most powerful student engagement tool in any classroom: relationships.
Building Community with Classroom Design
Community connection creates a shared experience of investment, ownership, and accountability in a classroom. While investment, ownership, and accountability positively impact behavior in communities of all forms, they also become a collaborative foundation for learning in classrooms.
Creating Spaces for Students to Collaborate
Student socialization can transform from being viewed as a behavioral obstacle to being recognized as a learning advantage. In 2018, a meta-analysis found that “working together with a friend and simply having a friend were related significantly and positively both to cognitive and performance outcomes.” Through thoughtful classroom layout, teachers can begin to encourage engaged, social students without fearing classroom chaos.
Planning to Adjust Layouts Based on Changing Needs
Classroom layout can support the larger class community as a whole and smaller communities present within a class. For example, layouts at the beginning of the year using small groups or desk pairings can encourage collaboration and friendship formation. These arrangements may be especially beneficial for teachers with first-year students. Alternatively, a teacher focusing on class-wide community cohesion and dialogue may start the year with desks in a large U or circle so students can see each other’s faces during discussions.
Flexibility and willingness to try new layouts are valuable for addressing each class's unique needs. Additionally, having clear structure and goals for different areas in the room—designating distinct places for quiet reading and collaboration, for example—can help students navigate transitions throughout the day.
How to Integrate Technology Into Your Classroom Design
Complications to classroom layout and community building have arisen in recent years when juggling in-person and virtual student needs in hybrid classes. Therefore, you should take technology requirements for virtual students seriously.
-
Strategically place cameras and microphones so the teacher and the curriculum are clearly seen and heard during lectures while mitigating random background noise in the room.
-
Have additional cameras on students so all classmates can see the face of those speaking during discussions.
-
If in-person tables are used for group projects with virtual students, provide appropriate distance in the room to help address noise concerns and have headphones available for partnered discussions.
Part of feeling safe as a virtual student is being able to see and hear instructions, knowing they can be heard and ask questions, and being aware of who is listening to them when speaking—especially when sharing something personal or trying something vulnerable.
What to Consider When Choosing a Classroom Layout
-
Community building priorities
-
Grade level
-
Technological needs for virtual students
-
3’ of navigable row space to meet the American Disabilities Act code
-
A plan for how to accommodate lectures, discussions, and group collaboration
-
Number of students in the classroom
-
Room dimensions
-
Types of desks or tables needed/available
-
Layout preferences within the space (window placement, etc.)
6 Classic Classroom Layouts
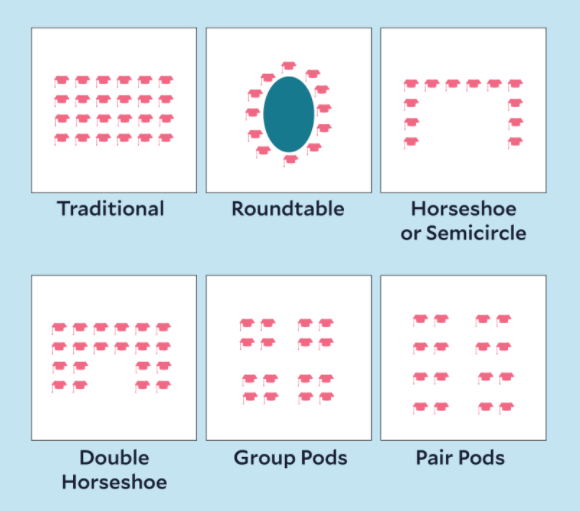
1. Traditional
The traditional setup typically consists of rows of fixed seating, and students all face the instructor. This classroom seating arrangement is historically common in colleges and universities and primarily supports a “sage on the stage” lecturing environment.
-
Pro: Prioritizes individual student focus by minimizing student-student communication. Ideal for activities like taking tests.
-
Con: The highest communication interactions between professors and students typically occur with students in the first row or along the middle of the classroom. Students in the back rows are less likely to be engaged.
2. Roundtable
Many seminar-course room arrangements consist of an instructor and students sitting around a single large table. This seating arrangement can also be formed using individual desks.
-
Pro: Students and instructors face one another in this setup, which can support whole-class and partner dialogue.
-
Con: Difficult to accommodate large groups and hybrid classes with virtual students.
3. Horseshoe, ‘U,’ or Semicircle
The horseshoe or semicircle offers a modified roundtable setup, where all participants face each other while the instructor moves about the room. The horseshoe encourages discussion between students and the instructor, as well as class dialogue.
-
Pro: A horseshoe setup can be particularly effective when the instructor wishes to project and discuss course-related material at the front of the class and when including a screen with virtual student participants to complete the circle.
-
Con: Although this setup encourages more engagement between the instructor and students directly opposite, students seated adjacent to the instructor on the sides of the “U” may receive less instructor interaction.
4. Double Horseshoe
This seating arrangement involves an inner and outer horseshoe and, similar to the conventional horseshoe, invites greater discussion than the traditional format.
-
Pro: Can accommodate more significant class numbers, and students may more easily interact with those near them or turn around and face students behind them for group work.
-
Con: More sightline obstructions during large group discussions when compared to a single “U.”
5. Group Pods
The group pod arrangement can be designed with rectangular, circular, or trapezoidal tables or individual desks. Instructors can place several tables together to form stations, or student groups.
-
Pro: Can be especially advantageous when students work in small groups with their classmates for a large portion of class time. More generally, this arrangement communicates a learning community where students are encouraged to work with one another and build peer relationships.
-
Con: Students may become attached to their smaller group instead of the larger class. Changing seat assignments throughout the year may allow for more integration and diverse collaboration.
6. Pair Pods
Similar to group pods, the pair pod arrangement can also be designed with rectangular, circular, or trapezoidal tables or individual desks. In this configuration, each pod consists of only 2 connected desks.
-
Pro: Promotes one-on-one collaboration, interpersonal skill building, and deeper friendship connections.
-
Con: Students may work better with peers outside their pairing or feel isolated from investing in other friendships. Regularly scheduled seat reassignments may alleviate this tension and foster opportunities for relational equity.
0 Comments